SEO 101: How to Install Google Analytics on Your Website
February 5th, 2016 by


So you want to take your business to the next level. You built this amazing website, but you have no idea if anyone is even looking at it. You’ve looked around online and found a pretty cool stat counter, but you need more information than that. That’s where Google Analytics comes in.
What Is Google Analytics?
Google Analytics is a robust tool used to track visitors to your site and how they arrived there—and it’s absolutely free. With Google Analytics, you can track how many visitors have viewed your website, what pages they viewed, how long they stayed on your website, and a lot more. You can even figure out where in your conversion process visitors are most likely to abandon the conversion. This kind of information is essential for truly optimizing your website to appeal to your visitors.
Hopefully, I’ve sold you on Google Analytics, but before we can glimpse any of those sweet, sweet metrics, we have to install it on your website.
Step 1: Sign up for an account.
Navigate to the Google Analytics homepage and select Google Analytics from the “Log In” dropdown. Then select “Sign Up” on the following page.
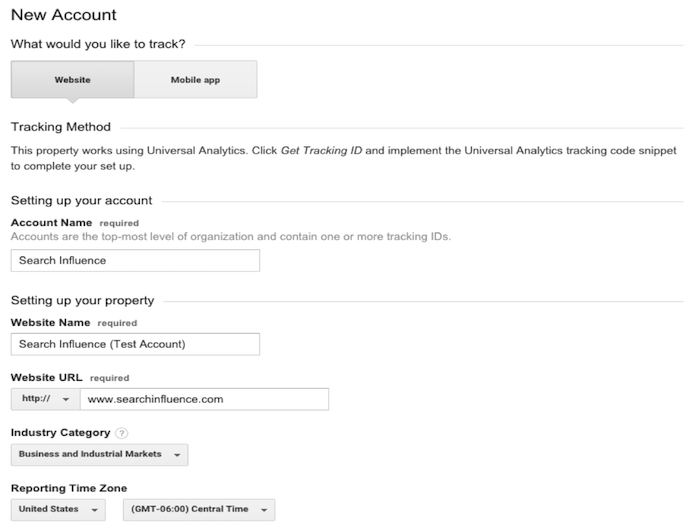
Step 2: Fill out information about your website.
Provide Google with basic information about your website, including its name and location. After filling out this information, accept the terms the conditions, and we’re almost there!


Step 3: Copy and paste the Google-provided JavaScript snippet onto your website.
Make sure you implement the JavaScript snippet so it appears once per page on every page of your website. This is important to make sure we track all users on your website accurately. If you are using a templated website, it is best to insert the snippet above the closing </head> tag.


Step 4: Filter all your internal traffic.
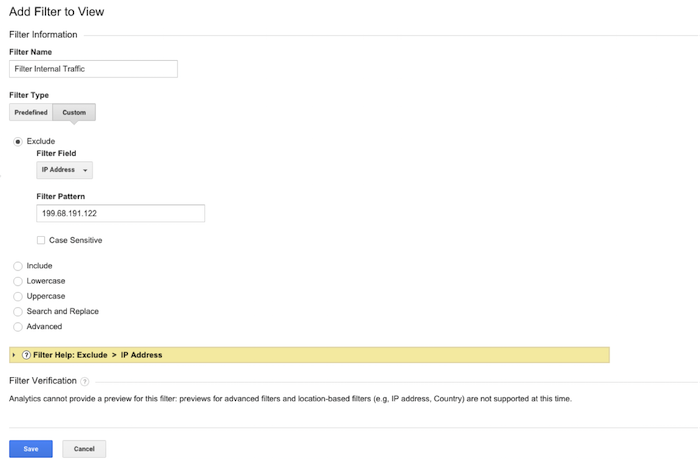
You don’t want the pageviews to your website to be skewed by your own visits to your site. That’s why it is important to create a filter that removes any visits from your IP address. You can easily find out what your network’s IP address by clicking on this link. Copy your IP address and navigate to the Admin section of your Google Analytics account. In the rightmost column, select “Filters” and add a new filter titled “Filter Internal Traffic,” as in the image below. Click save, and you’re all set!


Get tracking!


Great piece! I love the tip about filtering out internal traffic. I noticed you include information on adding Google Analytics above the tag, but not about using a plugin or adding it to your theme if you have a WordPress site. We just published a post that explains how to do this if you’d like to check it out: https://www.hostgator.com/blog/2016/08/01/add-google-analytics-wordpress-website/
This is really great! Google Analytics is quite important to track the traffic and the behavior of users so it’s quite important to install Google analytics code on every page of the website.