The Hitchhiker’s Guide To The New Google My Maps: Coding 101
November 13th, 2014 by
So along with many other recent Google Maps enhancements, Google has finally done away with the “Classic” My Maps. On September 16, Google sent an email to many users stating that “Google My Maps [was] being upgraded.” Recently, you were able to continue using Classic, but if you wanted you could upgrade to new My Maps. At this point all of your maps once created in Classic My Maps should have transitioned to the new My Maps automatically. As of the past few days the classic My Maps version has officially phased out.
For those of us who have become accustomed to the features of Classic My Maps, it’s easy to feel a little shell shocked by the changes.
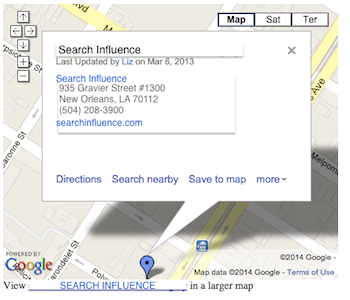
Before we start delving into the new My Maps, here’s three examples of the different types of maps you could/can embed on your site.
Old/Classic My Maps (EXTINCT) vs New My Maps – Respectively:


Simple Google Maps Embed:
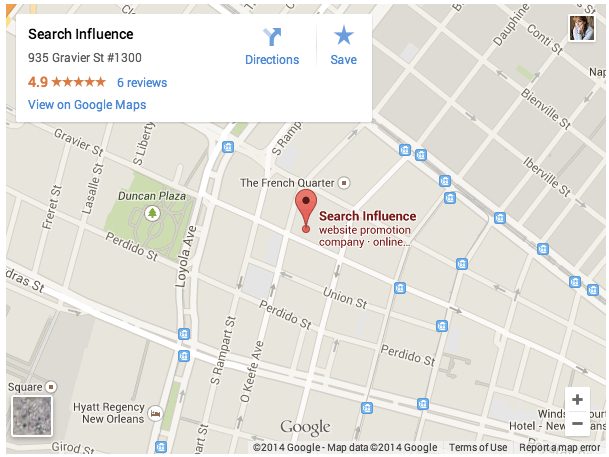

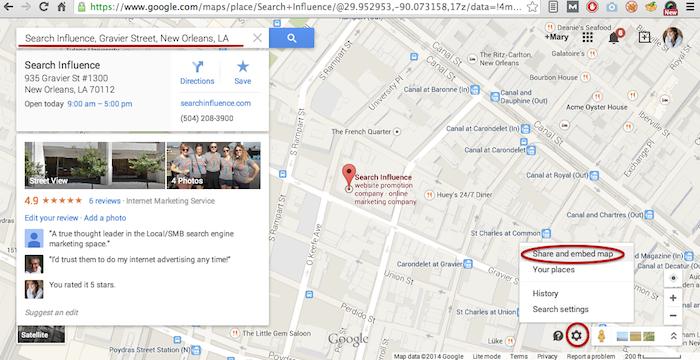
My Maps should really only be created when you need a map with multiple business locations represented in one map or when you want to create maps with service area outlines. Otherwise, for single-location clients you should use the Google Maps embed feature as shown below:

In the new My Maps, making the My Map itself hasn’t changed really, the map interface is just a little prettier. You can still import KML files as well as search and add plus page pins to your map. I’m here to help you through the major changes ranging from the simple movement of where to access features to the extensive parameter codes breakdown with the loss of InfoWindows. So let’s get to it!
New Tool, New Tricks:
First things first, where the heck did they move “customize and embed” button to get your embed code!? Well, as obscure and vague (to me at least) as it seems, it’s now housed in the folder icon on the left next to the “Add layer” button. It took me longer than I care to admit to sort that one out, so hopefully I save someone reading this that bit of time.
Old Location to Grab the Embed Code:


NEW Location to Grab the Embed Code:
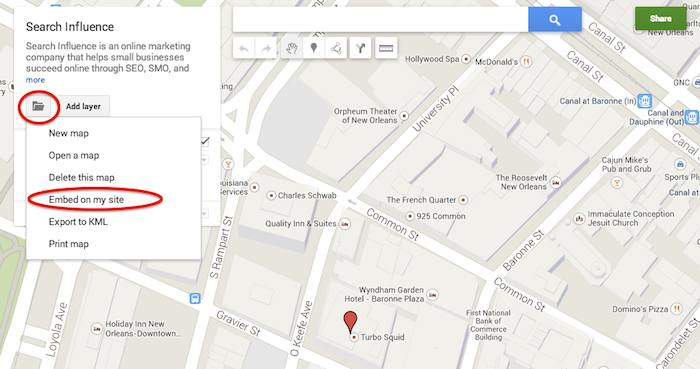

Learn to love that new folder. It also houses the button to create a “New map” once you’re done creating your map or whenever you need to start a new map.
IMPORTANT NOTE: You now have to share your My Map to make the map visible when you embed it, similarly to how you would share something from Google Drive. Click “Share” in the top right corner then I’d recommend to set access to “Public on the web – Anyone on the Internet can find and view.” The automatic setting when you choose “Public” is editable by the public. Unless you want to risk some strangers editing your maps, switch over to “view” only mode.
New Product, New Parameters:
Code Before and After:
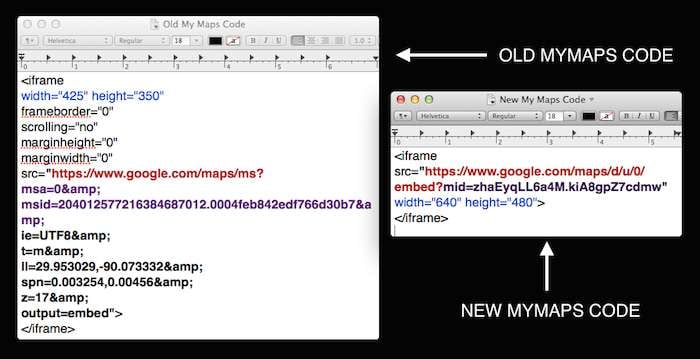

So as you can see in the image above, they’ve removed a lot of previously provided parameters, making the source attribute a lot shorter and more concise. These parameters were responsive to and generated by the now extinct InfoWindow. The InfoWindow allowed you to preview and adjust the My Map before grabbing the code. As previously mentioned, these adjustments must now be done manually.
First, for sake of knowing what we lost, we’ll cover all the attributes and parameters that were provided in the old My Maps codes.
Size
For the size of the maps, the InfoWindow used to let you choose Small, Medium, Large, or Custom.
Here’s what old My Maps defaults gave you:
Small: width=”300″ height=”300″
Medium: width=”425″ height=”350″
Large: width=”640″ height=”480″ (New My Maps is large by default)
Custom: WHATEVER YOU WANT
The parameters that adjust the source code are now separated by just “&” instead of the “&” parameter divider. I’m assuming that this change is a result of Google’s preference to save some characters.
My Map ID
First, you’ll notice that the parameters msa= and msid= have been replaced by mid=. The msa= parameter was used to set whether you were showing a particular, identified map (when set to 0) or showing other things like the My Map create form (when set to 2). Then when msa= was set to 0 to indicate that you were showing a particular map, you’d identify said map using the My Map identifier parameter msid=. It looks like the new identifier parameter, mid=, encompasses all you need.
Input Character Encoding
In the old code, ie= was used to set the input character encoding, which is typically set to Unicode 8 (UTF8).
Terrain
The type of terrain shown in the base of your My Map used to be set using t=. The following inputs will give you the respective results:
t=m: normal map (think white cities, yellow street lines, green parks)
t=k: satellite (the photographic, Google Earth look)
t=h: hybrid (combination of normal and satellite, street lines and photographic)
t=p: terrain (think atlas-type with shaded mountains)
Latitude and Longitude
To set the center point of the map, the code ll= would be used. Must be in decimal format and have latitude before longitude separated by a comma. Alternately, using sll= instead, with the same input formatting will set the latitude and longitude of the center point of the business.
Span
The parameter spn= was used to set the width and height for the geocoder to determine how many degrees of latitude and longitude will be shown.
Zoom
One of the most important parameters for My Maps in my opinion is the zoom adjusting z= parameter. Smallest input, 1, will show you all continents of Earth and the largest possible input (most zoomed in input) is 21.
The only one I’ve needed is the zoom parameter so far, but any of the above will work. I think the terrain parameter might be helpful as well, but that can also be done by adjusting the terrain of your map directly in My Maps under “Base map”. Below is an example of the new My Maps code adjusted with a zoom parameter in bold.


What about the popup window with all the dropped marker information!?
Sadly, there is no longer a parameter to make the information of the My Map marker already visible on your map. This marker typically contains businesses’ location information. Viewers will now have to click the marker in the My Map to view this information.
So, for single location businesses, the easiest way to get an embed code for your site, which shows your business info with the marker, is by using the simple “Share and embed map” feature already in Google Maps (see “Google Maps embed feature” screenshot above).
Hopefully this will save someone having trouble adjusting to the new My Maps some time from scouring forums for this info. Stay tuned for my future post on how to use KML files for service area business maps!


[…] The Hitchhiker’s Guide To The New Google My Maps, http://www.searchinfluence.com […]